|
|||||||||||||||||||||
|
|
|
|||||||||||||||||||||
|
|
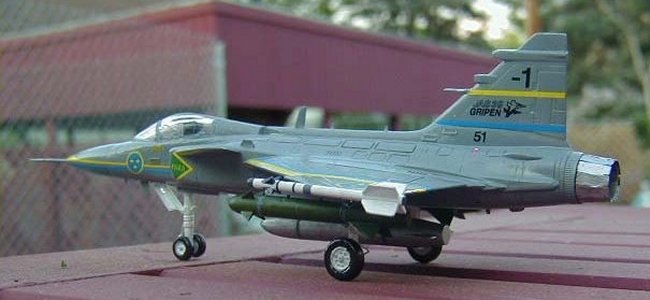
The build is pretty straight forward. It goes together well enough, but the detail is really hideously pathetic in the cockpit and engine. I originally thought I was getting a production Gripen with this model, but it turns out it was made back in 1989, and is more along the lines of a prototype. Once I realized that I just went with it. Okay, so it's a prototype, big whoop. If you can get past the cockpit, and by that I mean rebuild it, you'll do fine!
The beautiful thing about this kit is the wonderful selection of weaponry. You have no less than 15 sets of weapons. 1 set of course being the sidewinders, which can only go on the wingtips. One set being the RBS 15 F anti-ship missiles, which the instructions say can only go on the inner pylons (and nothing else, if you believe these instructions! -- this is inaccurate). From what I can tell, these pieces are more accurate than the later-issued versions with the modern retool of the Gripen kit from both Italeri and Revell. I decided to keep them for a future (accurate) Gripen model. You get a set of Mavericks, a set of 19x75mm rocket pods, a set of RB 71 Skyflash (AIM-7 Sparrow's European name, I believe), a set of TARPS recon pods, a set of RBS-15 anti-ship missiles (which my prototype sports) and a single center-line drop tank. I mixed and matched things in my head. I wanted to be somewhat original in my selection, so I decided to leave two pylons off (just for the heck of it).
Paints are Testors enamels. I tried to get fairly close to the recommended paint color, but if I got it or not is up for debate. Decals went on relatively easily, especially for some large shapes. The canard decals had to be trimmed to shape before dipping, as all 4 were oversized. I used a coat of future before and after decals, and tried to do some weathering using a wash, but I was unable to get it right so I covered the test areas up with the original paint color again and redid the future in that area. All in all, a learning experience, well worth the cost of the (albeit old) kit. I invite questions and comments via e-mail or the ARC forums! Mark Miller
|
|
Photos and text © by Mark Miller