|
Here’s my
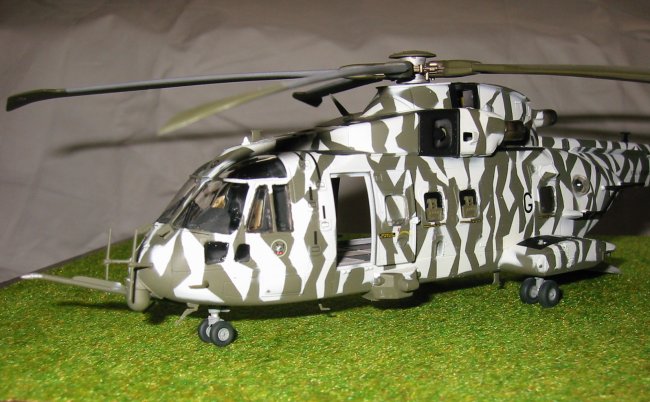
Revell (Germany) RAF Merlin. I saw
my first Merlin 2 years ago whilst on Exercise with the Army in Wales.
There I was slogging up one of the major mountains with my Bergen
(rucksack) on my back, wondering why the hell I joined the Army when, just as we
crested a ridge, so did a Merlin. To
say it looked and sounded impressive would be an understatement.
From speaking to a couple of people in the know, its supposed to be as
fast and manoeuvrable as a Lynx, which if you know helicopters is about as good
as you can get! Not bad for a
machine that is bigger than a Puma!
Generally
fit was really good, the only tricky area was in fitting the rear of the cabin
as the main fuselage mould has been split to allow the different variants.
The painting instructions are in the normal Revell own brand nightmare
making younger modellers undertake complicated mixes. Not a good selling point there Revell, please listen, it’s
the only thing that spoils your newer kits as the quality is good!
The “Orange Crop” ECM sensors on the nose would not fit at all so
they were left off. I managed to
get a couple of bits mixed up so now the Bumps in front of the sponsons through
which on one side the refuelling probe passes are now mixed up.
Shush! I won’t tell if you won’t ;)
The kit went together in a day
and a half of modelling and when complete I did not really fancy an all green
machine. So thinking that one day
we will see Merlin’s in Norway supporting the British Forces on Exercise there
I decided to give it a Tiger Stripe paint job like that applied to the Sea King
HC4’s operate by the Royal Navy. So
after everything clear was masked an overall coat of Xtracolour white was
applied. This was allowed to dry
for a couple of days and then some drafting tape was cut in fairly angular
patterns and placed on the kit to get the desired stripes. A coat of Xtracolour NATO Green was then applied, left for 2
days and the masking removed. The
engine intake areas were then masked and sprayed black. Jet exhausts were sprayed with the same NATO Green and left
to cure and then Alclad Burnt Metal was applied with a fine airbrushing of
Alclad Burnt Metal at the ends. This
looked pretty effective.
Decals were
then applied which were very good again being glossy and in register, no
silvering found at all. They were
bedded down with Aerosol and Aeroset. The kit was left to settle for a couple of
days before all wire cutters and aerials were then added.
Finally a mix of Xtracolour varnish 50% Flat 50% Satin was applied by
airbrush and left to dry for 2 days. All
masking was removed and that was it complete.
The
Xtracolour NATO green does look about right after the flat coat had been
applied. It’s a really strange
colour on the real thing, seeming to change colour and shade in different
lights.
I really
enjoyed this kit, nice to see another Helicopter on the market.
Now where’s my Italeri RN variant????
Greg
|