Having
seen many inspiring models supplemented with various Aires sets, I’ve yearned
for an opportunity to try these eye-catching enhancements firsthand. Not
particular with any specific subject, the detail set and parent kit both
happened to be on the local store shelf; I set forth to transform Tamiya’s
gull wing.
| One
can’t help but to be awed by the enormity of these Czech made add-ons.
Within are over a hundred intricately detailed resin and PE parts that
will put any modeler into a state of euphoria. Sheer delight, however, was
soon replaced by apprehension as reality struck. This is not a weekend
project. What have I gotten Into? Perhaps it’s not too late to exchange
the set for a GI Joe action figure. |
|
8
Browning receivers &
10 barrels are included
with the Aires set – a much welcome windfall
for the spare parts box. When opening the gun access panels, make the cuts
cleanly saving the removed parts. Ammo box panels between the two hatches
will be needed during final assembly. |
| First
order of business was deciding which access panels to remove from the
fuselage. The instructions weren’t entirely helpful to this regard. I
suspect it is an intentional omission as there are several display
possibilities. It cannot be over emphasize the need to visualize the final
product in one’s mind before reaching for the Xacto. |
|
Galvanized
wiring added to the reservoirs section.
All metal parts were
primed with Future wax prior to airbrushing. |
| In
addition to separating panels, the set also calls for removing all molded
interior features, with exception of the tail wheel well, from the Tamiya
kit. Kit plastic also has to be thinned down from the interior to
accommodate the new components. Using a motor tool with sanding wheel
attachment is perhaps the best method of performing both chores since the
recess areas are difficult to reach with hand tools. |
|
To
acquire greater visual balance with the detailing forward, elevators and
trim tabs were separated from the tail-plane and repositioned for a less
static pose.
|
| With
repeated dry fitting and sanding, the components fitted together
surprisingly well. Superglue was applied to join the fuselage halves
ensuring a lasting bond, but puttying was entirely unnecessary. |
|
Posing
the wings asymmetrically looks odd at first. The main purpose is to
provide more visual information for a potential viewer who’s unfamiliar
with the subject. Furthermore, most cockpits tend to be obscured with both
wing folds erected. |
MAKING
INSTRUMENTS
Experimenting
with software and a hi-res printer, I’ve found a simple method of
making photo realistic placards using flight simulation games. Click
image for explanation.
While
the transparency provided by Aires is perfectly adequate, this method
may come in handy for the budget conscious or on those occasions when
detail sets are unavailable for a given subject. Devotees for
authenticity might even make use of photographs from actual aircrafts
instead of flightsims bitmaps.

|
| Most
readers are familiar with USN’s 3-tone scheme consisting of FS35042,
35164, and 37880. Rather than using formulated colours, I opted to combine
various Testors’ flat/gloss enamels to obtain semi-gloss paints catering
to my personal preference of avoiding topcoats. |
|
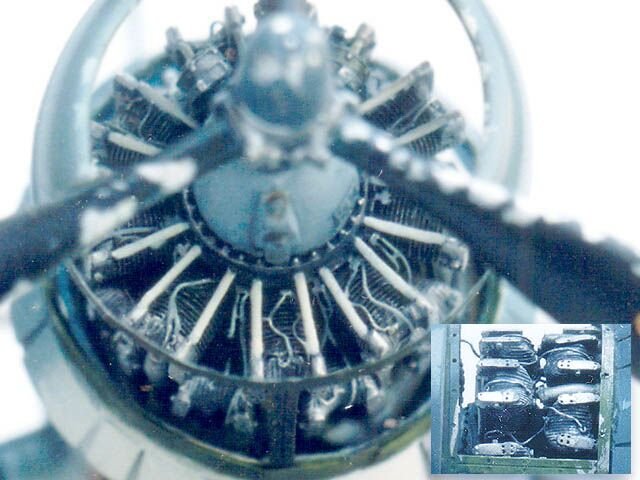
The
Pratt and Whitney
R2800 Double Wasp
was sprayed flat black,
then dry brushed
with Testor’s “Silver
Chrome Plate.”
|
On
hindsight, I should have gone with the subtler two-tone blue/grey scheme
and devoted more energy planning the painting/weathering for this project.
I’ve
always found Masking wire frame canopies difficult. After three failed
attempts, using different masking methods, I eventually ‘cheated’ by
adding True Detail’s Fast Frames transparencies.
|
|
Lenses
made from fiber optics substituted formation & approach lights that
were originally molded to the wings.
These were tinted with
Gunze clear acrylics.
Wing
tip lights were painted following Kaan Gok’s technique in the ARC Tools
& Tips section. |
FINAL
THOUGHTS
It
may seem peculiar to select a project for the sake of employing a detail set.
However, when accessories surpass model kits in the number of parts, complexity
and price; then I surmise this hobby has reach the crossroads where plastic is
in actuality subservient to resin & metal.
For
now, we turn to the cottage industries for parts, improvements and the odd
subject/scale neglected by the mainstream. But with the remarkable inroads made
by these same producers to satisfying our ever increasing appetite for detail;
will a day come when injection plastic become relegated to a remote corner of
the hobby shop where vacforms and basswood gather dust?
Moses
SITES
OF INTEREST
Written
material for the corsair are abundant on the web and in printed form. Therefore,
the links listed are those I’ve found containing useful visual references.
_______
|
|