|
This
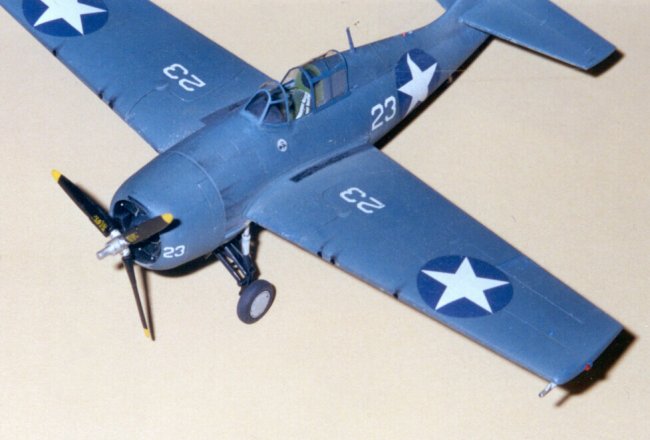
is Hasegawa’s 1/72 F4F-4 Wildcat as Lt. Cdr. John S. (Jimmie) Thach’s plane
during the Battle of Midway.
This
is an excellent little kit in both detail and accuracy and is probably the best
F4F to date in 1/72. It looks and sits so perfectly that I could scarcely find
fault with it. Hasegawa has done a good job of capturing the Wildcat’s
pug-nosed ‘30s look and aggressive stance.
Thach
flew this plane, BuNo 5093 of VF-3, USS Yorktown, on 4 June 1942. He destroyed 3
Zeros on the first sortie, but 5093 was shot up. After landing safely on
Yorktown, he took another F4F (5171) and shot down 3 Kates. Thach landed on USS
Enterprise after Yorktown was bombed and torpedoed. 5093 was probably pushed
over the side of the sinking Yorktown. This was the first time the Thach Weave
was used in combat.
Construction:
The
kit is beautiful and builds easily. Starting with the cockpit as usual, True
Details resin cockpit and wheelwell sets were used. These are nice little
castings and very inexpensive. The Wildcat cockpit has a lot of bronze-green as
well as interior green. The gear bay is underside color with mostly black
details. Check your sources. The finished cockpit is given a coat of sun fade
(tinted clear flat lacquer) sprayed lightly from above. This highlights areas
exposed to sunlight and makes wash unnecessary. Details are 6B pencil and
drybrushed aluminum, lenses in clear gloss, switch covers red.
I
suggest gluing wings to fuselage halves before gluing halves together.
This allows gluing from inside.
The
engine is painted a little darker than scale with graphite highlights. The
ignition harness is flat aluminum and the crankcase is gloss engine grey. Props
and engines are clean and relatively shiny even on weathered Wildcats. The kit
engine looks good so I didn’t replace it. Note no logos on prop blades, only
stenciling. Carrier planes don’t show a lot of prop and leading edge chipping
(no rocks to kick up on carrier deck). Save the chips for land-based planes.
The
resin parts fit well. Fuselage fit is excellent and should need no putty. After
the main airframe was built up, I sanded and reworked nearly every surface. The
kit surfaces are very detailed and you can certainly skip this step if you like.
Control surfaces were scraped spanwise to simulate taut fabric. Panels were
sanded with 1500 paper parallel to airstream. Control surfaces and wing folds
were rescribed. Tiny gaps were filled with putty thinned with liquid cement and
lost panel lines were restored. The stepped area behind the windshield was
filled and the glare shield sanded to match the upper deck contour. This, with a
vacuform canopy, adds greatly to the Wildcat look.
Painting:
The
plane is painted with a soft, subtle look. I don’t believe in the preshade,
heavy wash, open-panel, squishy-tire, giant-paint-chip school of overdetailing.
Nearly every panel of this plane is weathered differently, but you must be very
close to see it. It’s a faded but well-maintained plane that invites close
inspection.
The
paint is Testor’s MM enamel, approx. 60% 35109 blue, 35% 34192 grey, and 5%
ANA 613 olive drab. This matches the sample provided on the Aeromaster decal
sheet (72-093). 34192 can be used as is for underside color. Chips, worn areas,
and oil streaks are applied before the gloss coat. Aeromaster decals are applied
with the usual solutions. Walkways are cut from black decal.
The
milky sun fade is sprayed in light coats and slowly built up. The advantage is
that the markings are faded as well as the paint for proper contrast. The fade
also shifts with lighting and follows highlights. New chips, new oil stains, gun
and exhaust soot are added after the fade.
The
windscreen is Squadron, but the canopy hood is sheet acetate. It’s bent cold
and is perfectly transparent. Belly windows and gunsight are also hand bent and
very clear.
F4F
landing gear is complex. I added a few details and faked the rest with paint.
The main beam area where the gear links and doors pivot should be dark. This
will help minimize its lack of detail. This area is sooty and in shade anyway.
Holes in beam and gear doors are faked with dots of black. A light spray of
exhaust soot will blend everything together. Third set of gear linkage is
simulated with sprue attached above kit’s 2 links. The simplified gear is no
fault of the kit. Gear bay is clean except for staining around the main beam.
Kit wheels are good. Wildcats do not have squishy tires.
The
antenna wires are strings of weatherstrip adhesive drawn very fine. They are
almost invisible in photos, and hard to see from more than a few inches away.
This is about right for 1/72 scale wire. IFF antennas are done as well as main
aerial and lead-in. Insulators are dots of copper paint.
Formation
and navigation lights are painted for an illusion of brightness. Base color is
dark, with a dot of bright highlight of the same color, topped with lens of
clear lacquer.
The
plane looks smooth and monochromatic until you get very close. Chips and panel
lines are nearly invisible, as they should be. I definitely wanted to avoid the
sliced-sausage look of so many Wildcat and Hellcat models. Crisp control
surfaces, close-fitting canopy, and thin antenna wires add more to the
impression of scale than deep, heavily-washed panel lines.
(click on
the image below to load the full size photo)
Summary:
I
highly recommend this kit (AP159) and others in the F4F family. It is one of the
best 1/72 kits I’ve ever seen. Excuse me for gushing. The worst things I can
think of:
1.
Reboxed kit includes only the supplement decal sheet; original schemes
can’t be built from the kit.
2.
Antenna mast has a sprue right in the middle. This requires tedious
cleanup in a very visible area.
3.
Tailwheel should have a 2-bladed fork.
4.
Kit includes only squared-off prop hub; cuffed Curtiss Electric prop
should have rounded hub.
Tailwheel
and rudder antenna are very fragile and should be protected with tape. I broke
both of these items during normal handling. Nitpicking aside, this is a really
sweet kit of a worthy subject.
Morrell
|