|
The History
“AIRMOBILE” is the word
being mostly used during the Vietnam War. There is no weapon can symbolize the
US military presence in Vietnam like the “Huey”. The nickname ‘Huey’ was
universally preferred to the official Iroquois. During the September, 1967. The
US Army alone received 3,573 UH-1 Huey and plans to keep 2,700 of them in
service into the 21 st
century. As for the ground War, the M113 APC (Armor Personal Carrier) is the
second machine that was mainly used by the Army. The advent of light weight
aluminum armor and the ability to weld it for mass production yield numerous
design benefits that were integrated into a low-cost, effective troop transport.
During the War, the US Army alone employed almost 26,000 M113 in its various
forms.
The Models
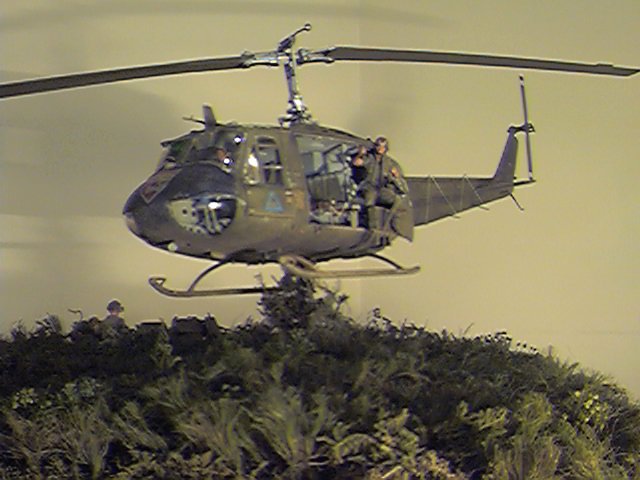
The UH-1D is the troop transport
version of the Huey, it can carrying 12 fully equip soldiers and 2 pilots. The
model is based on the Revell kit which released some 20 years ago. However, the
surface detail is excellent. The only thing I am not happy about is the scale ,
which is 32nd instead of 35th . Well, if you want to build a UH-1D for diorama,
I guess there is not much to choose from.
As for the M113, it is also one
of the oldest kits from Tamiya and produced in the mid 70’s , but the
kit is almost prefect in 35th scale, it also included a full interior from
the engine compartment to the troop cabin . It is truly a Tamiya master
piece.
|
 |
|
Click on this
image to see larger image |
|
The Construction
There was a lot of detail I needed to
add on the Huey itself. First, I built the interior and rotor assembly, I put
the support pole in the proper place and scratch built the passenger seats
around the engine wall and support poles. The passenger seat’s frame used 0.035-inch brass rod and the seats' curtain are made out of the aluminum foil. I
also had to rebuild both pilot’s and copilot’s seats into armored seats,
I used a 0.01-inch sheet styrene for the armor plating and also added seat belt
hookups and seat springs. The rotor assembly was nothing but adding nuts and
bolts. I really want the chopper spinning, so I added a small electric motor
inside the engine compartment and now my Huey can be brought to life!
| Most of the Huey during the
Vietnam War had the small door behind the pilots removed, so I did that
to. The other thing I don’t like about the Revell kit is their plastic window
section. It is way too thick and gives so much distortion when you look through
it. I used some Squadron clear thermaform and vacuum form by using the Revell window
as a guide. I also replaced the windshield wipers by scratch builting them
from styreme. Finally, I cut out the engine screen and replaced by fine mesh
wire.
|
 |
|
Click
on this image to see larger image |
|
|
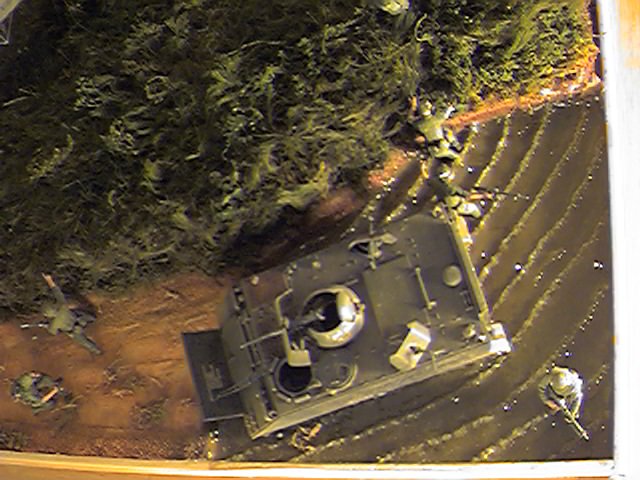
The M113 is pretty much built
stock except for the addition of the armored turret and gun shields, this
machine was badly hit by a RPG round on the right side and caused a internal
explosion which stopped near the river side. The battle damage on the M113 is
done by using my Dremel tool and a hot iron.
|

|
| Click
on this image to see larger image |
|
Painting
Both the M113 and the Huey received a
coat Oliver Drab from Humbrol paint. The interior of both models is matt white. After
I let them fully dry for 48 hours, I gave both models a full treatment of weathering. I
used raw umber oil paint and thinned it down to one part of paint to 7 parts of
thinner, then applied this section by section and wiped it off by using the a clean
cloth. The highlighting was done by dry brushing.
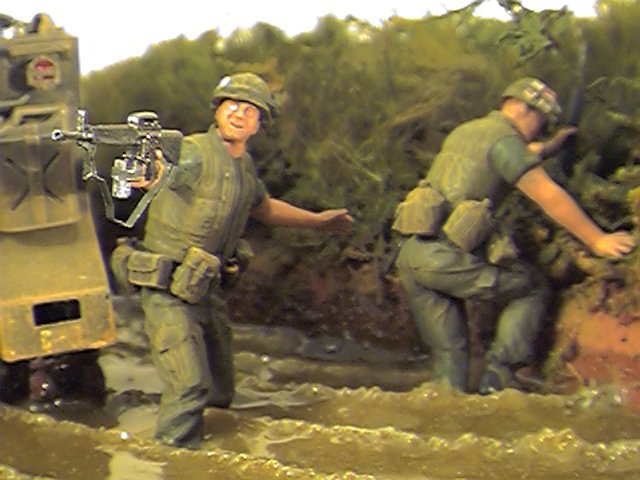
Figures
|
I won't go through all the
detail on these figures. I combined all the figures from Dragon, Airfix and
Verlinden, then I interchanged all there heads and arms. I painted their uniforms
with enamel and their skin with oil paint.
|
 |
|
Click on this image
to see larger image |
|
The Base
 |
 |
|
Click on these images to see
larger image |
The base for this diorama is made
out of a ˝ inch thick plywood measured by 16”x 22”. First, I marked where
the water would be, then I build a fence around its area .I know that the jungle
would be above the water, so I had to raise the jungle area with ˝ inch
plywood. After this was done, I covered the whole base with Celluclay and sand.
When the celluclay had dried, I glued all types of dried flowers and moss with
white glue to the base. After it had dried, I pushed all the plant life down
with my hand so it would look as if the force of the rotor was blowing the
plants down. The water was made with a commercial product called Enviro Tex Lite,
this is mixed 50/50 resin and hardener. I poured several layers approximated
Ľ inch thick. This is done to ensure that no heat build-up would take place. It
took five hours to set up enough to pour another layer. In order to get the
muddy-water color, I added a few drops of Humbrol paint ( ground color mixed
with forest green). Finally, the base was airbrushed with different shades of
green and everything was glued into place.
Conclusion
The whole project took me
more than 5 months to finish. However, I did enjoy every minute I worked on it. Due
to the availablity of the MRC Huey kit on the market, I always want to build
another accurate Huey in the future. The model won a first place in 1995 IPMS
Edmonton Annual Contest and the Best Diorama Trophy.
Ricky
(click on
the image below to load the full size photo)
(use your
back button to return to this page after viewing full size photo)
|
|