|
Being an avid Canuckophile, and in the habit of
picking up any Canadian decals I see, I had built up a small collection of the
Leading Edge CF-18 "Specials" decal sheets and got to the point where
I figured I’d better use them, instead of just fantasizing about actually
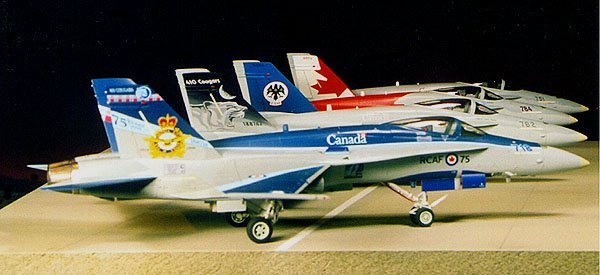
building a model with them. I had a stack of the 1/72 scale Hasegawa F-18A kits
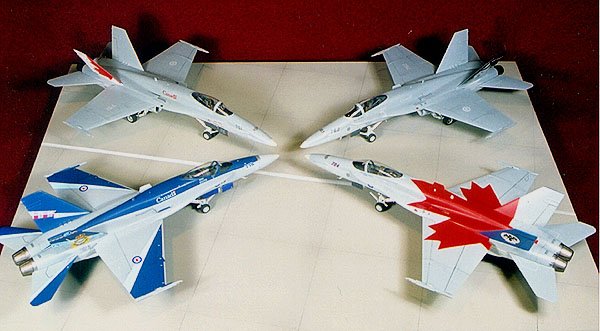
on my shelves and in a fit of inspiration decided I’d build four of them at
the same time to use up some of those colourful leading Edge decals. While
reasonably nice, the Hasegawa Hornet kit dates from the ‘80’s and could
stand for some additional detailing. Since I was going to build four of them at
the same time, I elected to keep things simple and just do some minor detailing
to dress the models up a bit.
The first step was to sort through my CF-18 file
and study the various decal set instructions in order to see what small
differences there were from plane to plane in order to get the pictures in my
mind. The basic airframes were all the same in terms of fittings, being
"clean" (no wing ordnance pylons), but at least three of the aircraft
carried the fuselage centerline pylon for the necessary fuel and/or baggage pod
for those long flights between airshows. It was going to be "assembly
line" time.
Generally following the Hasegawa instructions, I
started with the cockpit and ejection seat assembly. The cockpits were painted
in various shades of grey with some light dry-brushing and dark wash to add
depth. Lead foil seat belts were added to the kit ejection seat, painted a
"metallic khaki" to match the photos I was using for reference. Some
miscellaneous stencil decals were added to the seats to dress them up a bit,
too. The kit instrument decals were used since I was going to keep the canopies
closed, and they look quite convincing through the kit glazing. All four of the
"offices" were completed in a couple of nights and put aside while I
turned my attention to the basic fuselage assemblies.
I’m in the habit of test fitting and adjusting
the fit before I get out the glue, and even though Hasegawa is well known for
it's good quality kits, there were some problem areas to deal with on these
Hornets:
The fuselage side pieces under the wings need
to be slightly twisted and bent to fit properly, and even then other are
gaps to be filled at the rear fuselage joints.
The engine intake tunnels are quite barren
and open, and need blanking off along the insides to create a
"tunnel" effect.
The intake lip pieces need fairing into the
inside of the intake tunnel with putty to blend them in.
The nose cone needs a bit of TLC to get a
tight fit to minimize any joint at the mating face to the fuselage front.
There are gaps (even with gentle clamping)
along the bottom to top fuselage halves joints under the LEX.
The upper fuselage section behind the canopy
needs some adjusting to fit flush and square.
The canopy to fuselage shelf is a bad fit -
the canopy is too narrow compared to the fuselage deck, so if the canopy is
intended to be closed, some shaving and sanding will be required to get a
flush fit. The alternative is to display the model with the canopy open, but
that means that a bit more detail will be needed in the cockpit.
One thing I discovered too late was that the
molded-in electro-luminescent strip lights are not the same size as the
decals provided by Leading Edge. Fill them NOW before you get too far along.
None of these issues are beyond the ability of
even a neophyte modeller, it just takes a bit of care in the assembly. I found
the panel lines on the kit a bit vague and indistinct, and if I was going to
build a "detailed" level model, I’d probably rescribe a lot of them.
As it was, I intended to use a drafting pencil to highlite them later on anyway.
The basic fuselage assemblies went together fairly quickly, and in the space of
a week I had the complete airframes of all four models done and on the desk. The
vertical tails need a bit of care to align, and the gaps at the roots need a
touch of filler. Watch the wing joints as well as they tend to be a bit
"loose" and will sag on you if they are not supported in a jig or
other struts. The only departures from "straight out of the box" that
I made were:
Adding the small vertical fin reinforcement
lugs along the inner bases.
Filled in and re-contoured the deep wells in
the fuselage sides where the missile wells are.
Filled in and boxed-in the intake tunnels to
look more realistic.
The canopies were dipped in Future and allowed to
dry a week before I attached them to the models with white glue. At this point
it was time to think about painting and a more detailed appraisal of the four
different colour schemes was needed to insure the correct camouflage
demarcations were going to be used for the right decal scheme. I also got all
the other parts prepared for an assembly-line painting effort. All the landing
gear doors were cut off the sprues and cleaned up and stuck to some masking tape
so they could be painted at the same time as the models. Similarly all the
landing gear legs were cleaned up and held in small electronic clamps for
painting them all flat white.
All of the canopies were masked off with Bare
Metal Foil and the painting began. The underside colour (FS16375) was sprayed on
first (note the gloss designator- I used XtraColour gloss paints), and all the
landing gear doors were painted at the same time. I waited a week for that paint
to dry and cure thoroughly, then masked off the demarcation lines for the upper
surface colour. The fun part of this exercise was the area between the wings and
stabilizer to get the proper separation of colours. Many small sections of
masking tape helped! The upper surface grey (FS15237) was sprayed on in a
several light coats to get a good solid, even coverage of paint. Another week to
allow that coat of paint to dry and then the individual tails were treated to
their colours.
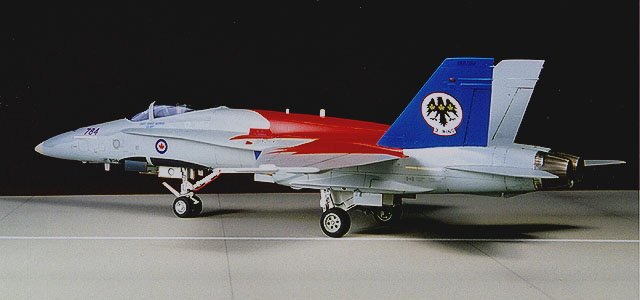
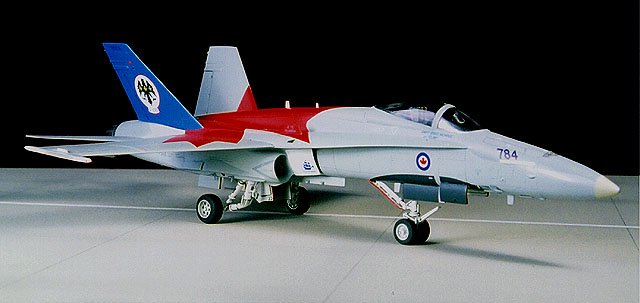
The white tail 70th. Anniversary CF-18
was pretty easy, as was the blue tail 3 Wing aircraft, but the two other models
needed a bit more time and effort to achieve the proper finishes. The 410 Sqn.
Cougar Tail needed multiple masks and shots with darker shades of grey to gloss
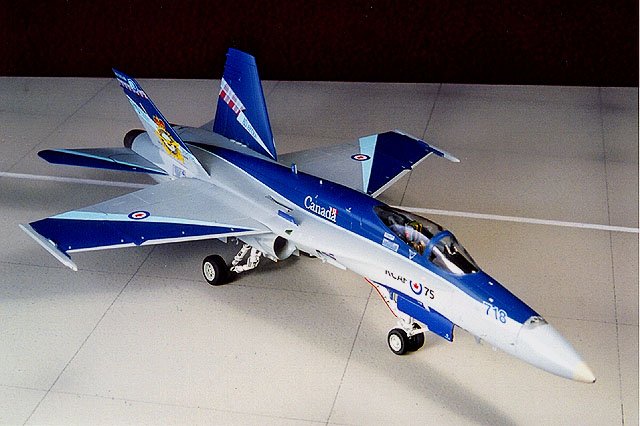
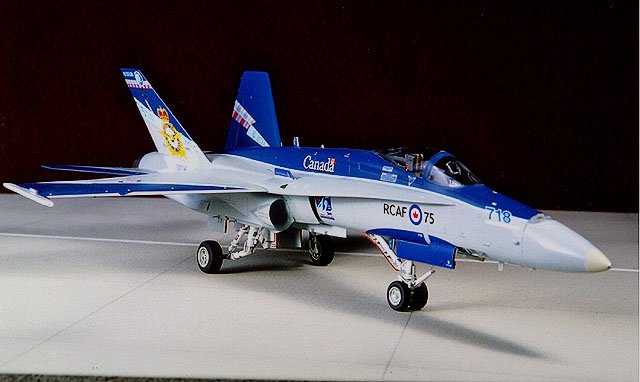
black to match the actual aircraft, while the 75th. Anniversary
Hornet needed major masking over the whole aircraft in order to spray on the
dark blue colour. I used Floquil’s Railway colour R-51 to match the dark blue
for this model. It dries with a matte sheen and needed a coat of clear gloss
finish to allow the decals to be applied later on. While easy to describe in
words, the painting stage for the four models took me a good three months to
eventually complete and get all four models ready for decals. This is mainly due
to my lack of discrete "painting times", with family and other time
pressures only allowing a couple hours every weekend to do some spray painting
in the house. All of the landing gear, wheels, and inner gear door faces were
sprayed with Testor’s Model Master Header Flat White, on the way by. The
wheels were masked off with disks of masking tape and a dark grey
"rubber" colour was sprayed on for the tires.
With the main workbench clear, and all four
Hornets arranged in front of me, I spent some quality evenings over the course
of a month to apply all the Leading Edge markings. I worked on one model at a
time in order to be able to apply all those stencils without getting them mixed
up. (Did I mention there were a lot of stencils!? There were a ton of miniscule
markings that had to be applied!). There were no problems noted on any of the
decals, other than some silvering problems I had with the 70th.
Anniversary Hornet model (the first one is always the "test case")
which was eliminated on the rest of the models by using a diluted Solvaset and
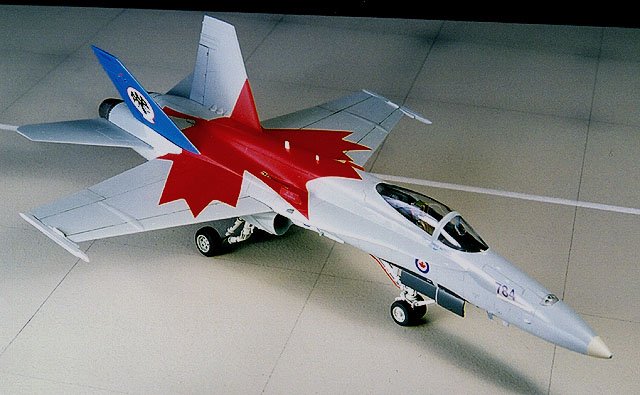
white glue mixture on the larger decals. The large red maple leaf on the top of
the 3 Wing aircraft was applied as one decal and with a bit of water and some
careful positioning, it went on and snuggled down just fine. Some modellers may
want to mask this off and paint it rather than wrestle with such a large decal.
All decals fit just fine without any need to trim or adjust them, other than the
formation light strips which, as mentioned earlier, did not match the engraved
panels on the Hasegawa kits. Even the false canopy decals for the nose gear area
went on without too much trouble. There was a small dimensional problem around
the canopy where the stencilling goes – the Leading Edge decals are quite
sharp and to scale, and it appears that the Hasegawa canopy base is "too
low" on the sides of the fuselage (ie: the vertical dimension between the
top of the leading edge extensions to the base of the canopy is too short, so
the decals don’t quite fit). When I build a "superdetailed" CF-18 I’ll
be sure to address this problem!
Once all the decals were dry, I spent a few more
evenings applying various washes and pencil lines to add a bit more life to the
models. I used watercolours on top of the enamels to insure I wouldn’t mar the
gloss finish. I also assembled all the gear doors and gear legs to the models at
this time. I managed to arrange a clear Saturday afternoon and hauled my
airbrush "kit" downstairs to use the stove-top spray booth. Not having
the space or resources to have a dedicated paint spray booth, I use the next
best thing: cover the stovetop with newspaper right up the wall to the range
hood to protect everything from paint overspray, turn on the light and the fan
and spray away. This works when you have a range hood that is ducted to the
outdoors, but a lot of range hoods are the recirculating type which blows the
air out right at face level from the front edge of the hood – not too good
when you are atomizing solvents and enamel paint! Anyway, I mixed up some
semi-gloss Dullcoat using the jars of Testors clear gloss and Dullcote with 50%
thinner and sprayed all of the models in one frenzied session.
I allowed another week for the clear coat to dry
before I even thought about handling the models. On went the wheels and out came
the drafting pencils for a few more panel line details. I also peeled off the
canopy masking and cleaned off the adhesive residue by polishing with Turtle Wax
automotive wax.
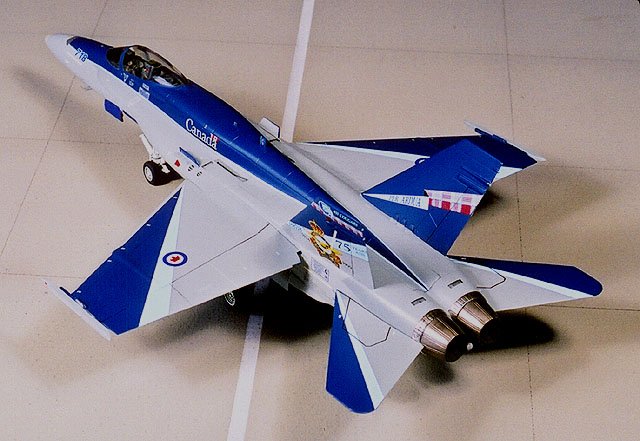
The exhaust cones were painted with Metalizer
brand burnt metal colour while the sections on the tail end of the fuselage were
treated to Bare Metal Foil. The exhaust cones were polished to a dull sheen and
glued on with white glue to allow some "setting up time" to insure
they were centered and aligned properly. I applied some red, blue and dark grey
washes to the Bare Metal foil area to give it that "hot metal" look to
match photos from my file. The insides of the exhaust cones were painted flat
black then swabbed with grey pastels to represent that streaky look.
The last things to be done to the models was to
add the pitot heads along the lower nose, the angle of attack indicators, the
small missile cradles along the lower fuselage sides, and the probe located just
aft of the nose gear well on the port lower side of the fuselage. The pitot
heads and angle of attack indicators were made up from small bits of sheet
plastic and stretched sprue, then painted metallic gunmetal. The missile cradles
were added using small curved bits of lead foil glued onto small posts that were
glued into pre-drilled holes in the missile rail area.
I used more chalk pastels and cotton swabs to add
some weathering to the models, based on photos of the actual aircraft being
represented. The cleanest aircraft was the 75th. Anniversary Hornet
followed by the 70th. Anniversary CF-18, and then the two other
aircraft. The flat grey paint used on the Hornets really attracted a lot of
grunge, and many of the commonly accessed panels on the airframes were quite
marked up by fingerprints, foot prints and fluid streaks. The upper wings and
wing hinge joints especially showed long dark streaks of grunge even after a few
flying hours. Similarly the fuselage undersides aft of the main landing gear
wells were pretty stained by dirt and fluids. As soon as I thought "maybe
one more pass with the pencil or pastels" I stopped and, decided the models
were finished. It’s too easy to go too far and screw something up when you are
at the end of a project!
References:
Since the models were essentially straight from
the box, I really didn’t need to pore through scads of photos and references,
other than my own files photos of various CF-18’s for some of the weathering
and panel line details. The Leading Edge decals have very complete painting and
detailing notes so there really isn’t a need for a lot of other references.
Geoff
|